Tuesday, July 27, 2010

Magic Sticks

Have a cousin with us this week, so I was lucky to find inspiration on Crafy Crow for this fun activity today...painting sticks!
The kids searched for sticks and then had a great time painting them. Without any direction, they were free to use their imaginations.  Their sticks turned into magic wands.  (We never tire of Harry Potter in this house.)
One stick became a rainbow for a lucky garden gnome.

Wednesday, July 14, 2010

Fairytale Garden Update

The Fairytale Garden is doing well.  The Magic Beans are climbing everywhere. The 'pole beans' sign is barely visible in the picture below.  Some new bug is eating the leaves, but it hasn't stopped the beans from growing.  (New Bug is yellow and spiky; the chickens won't even eat this strange creature, so I'm hoping he just goes away.)
The Cabbage Patch is gorgeous.  Having never grown cabbage before, it is a thrill to watch the purple leaves form cabbage heads.  I've weeded out some of the crowded plants; the chickens love them. The primary reason for growing cabbages is to feed them to the chickens.  I enjoy purple cabbage, but my family does not much care for it. The plants add a nice color to the garden, so I'm glad to have them, even if the chickens and I will be eating them alone.
Cinderella's pumpkins are starting to grow.  Additionally, some of the squash we planted with the pumpkins are growing nicely.
The potato plants are starting to die off, which is good.  That is exactly what we've read they should do.  (It is always a relief when the plants have read the same gardening web sites as the gardeners.) 
We've seen a few fruits on these plants, which surprised us. Who knew potato plants made fruit?? The fruits look like green tomatoes, but we've read that they are toxic and not too common.  The potatoes are teaching us plenty, as we are new to growing them.  They are also the most controversial member of the Fairy Tale garden, since they are not an obvious character in any popular fairy tale.  It has come to our attention, though, that they are popular in folklore, having sparked Mr. Potato Head, hot potato, "one potato, two", and more.

Tuesday, July 13, 2010

Harvest Shot

We often quiz the kids at dinner, "What on your plate comes from our garden?"
 For dinner last night, we had an egg frittata with parsley, roasted potatoes, carrots, and zucchini, and a sweet ending of yogurt topped with blackberries, blueberries, and wineberries (not shown in the above picture--as I was mixing the berries with sugar and cinnamon, I sent my oldest child to go gather a cup of them from the woods; wineberries are the wild cousins of raspberries and are plentiful around here).  The pole beans will be dinner tonight.  : )

Sunday, July 11, 2010

Camp Gramp Beads

If there is one group of things our family has collected over the years, it's beads.  I've written before about our fuse bead collections (now, thankfully, put to good use!).  Today I share with you what we do each year at Camp Gramp with all of our other beads.
While my parents' grandchildren are staying with them for the week of Camp Gramp, the kids have a variety of daily responsibilities:  cleaning their rooms, grooming themselves independently, tidying-up the kitchen and bathroom areas, and completing activities together in a positive way (read: no bickering!!).  We reward these great behaviors along the way by giving out beads.  The coolest beads are reserved for the toughest tasks.

Each year the children collect the beads a little differently. This year we hung our beads on regular shoe lace necklaces.  Last year, we used curly shoe laces and hung them in the bedrooms.  The girls still have theirs hanging up as a fun reminder of Camp Gramp.

Thursday, July 8, 2010

Nail and String Art

When we pick crafts for Camp Gramp, we want them to be fun (of course!), to be useful in some way, and to teach some sort of skill during the process.  Nail and String Art is an oldie but a goodie. I have fond memories of my grandfather giving me a block of wood, a hammer, and some nails when I was bothering him in his workshop back in the '70s.  To a child, it is a great feeling to hammer nails, even if it means hammering fingers every once in a while.  It is the perfect activity to teach physical limitations, empowering the child with ownership over the product and the possible pain.  Surprisingly, there were very few injured fingers when we did this activity at Camp Gramp. Kids learn very quickly how to hammer without hitting a finger.
Having seen this craft a few years ago in Family Fun magazine, all those memories came back to me and I was determined to one day fit this craft into Camp Gramp.  As usual, things don't always go as smoothly as I hope, and this year I was particularly busy during the week before Camp Gramp started.  As a result, on the day of this craft, my father was busy cutting the wood while I was still searching his garage for appropriate nails.  We weren't so well prepared.

But children have a way of surprising everyone.

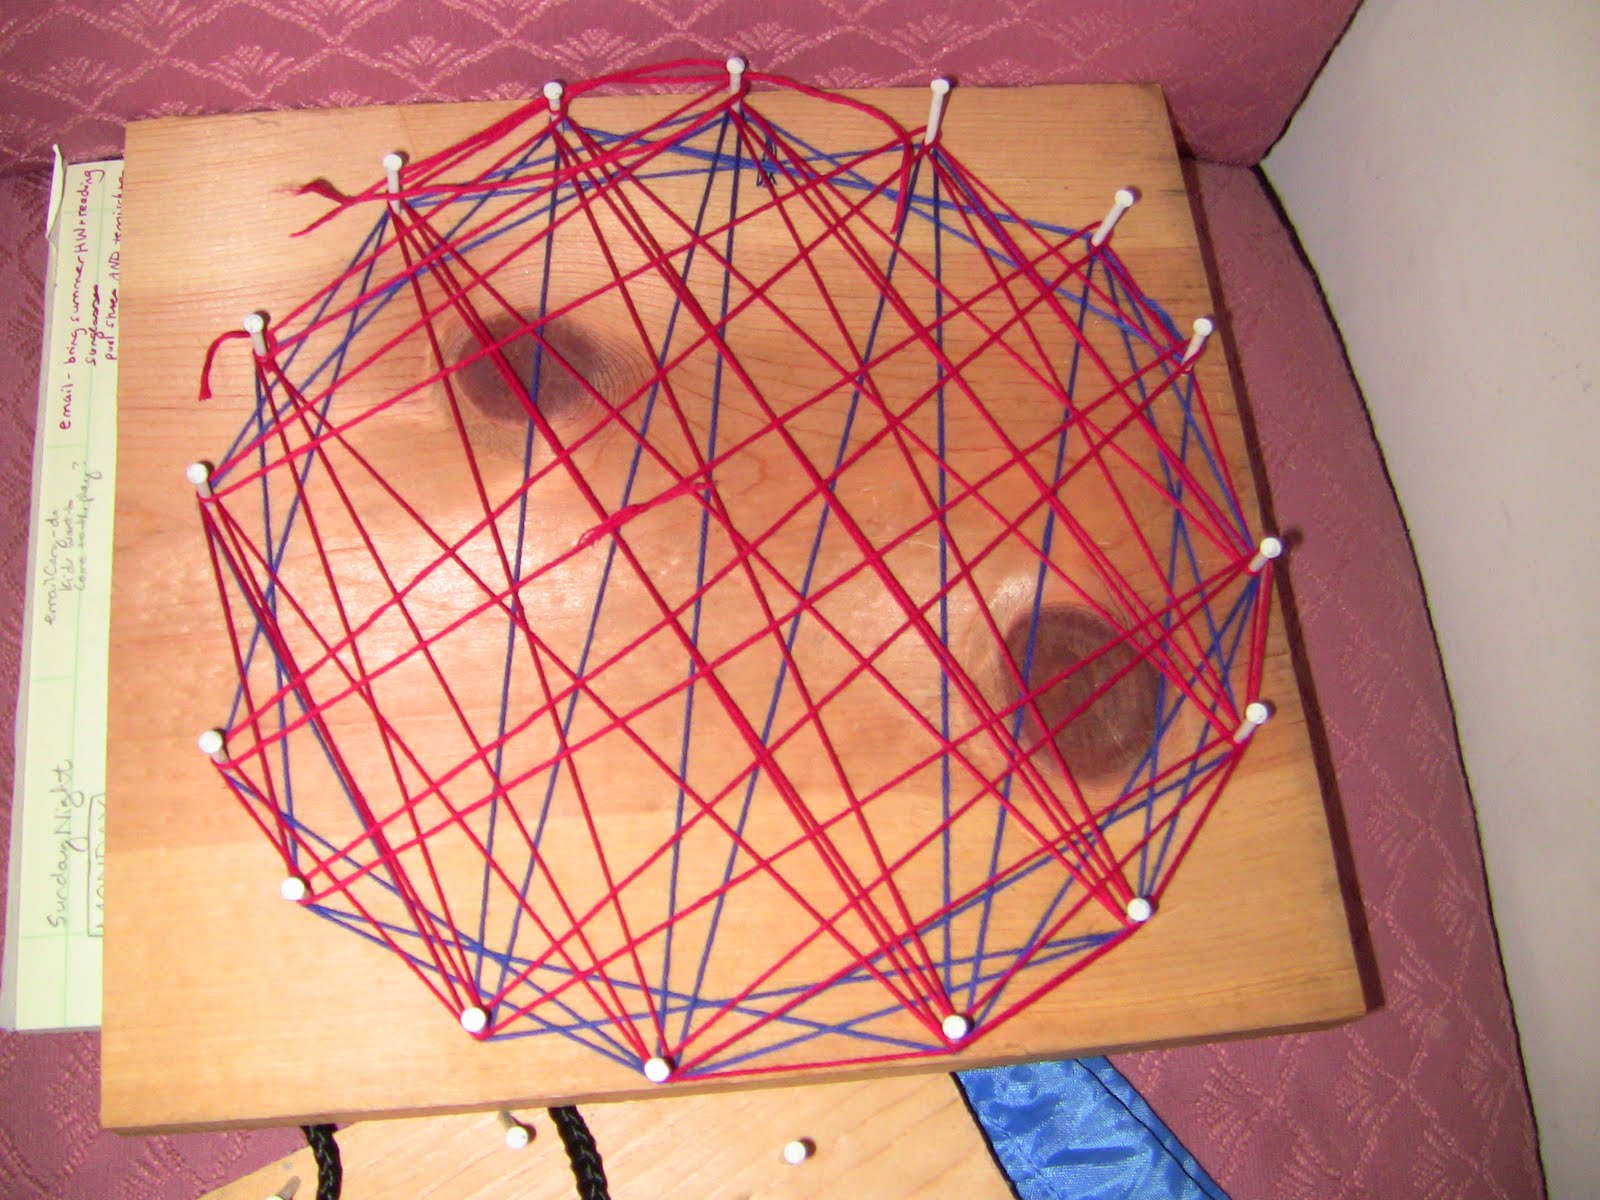
Even with my extreme lack of preparation --I had given very little thought to how I'd explain the directions; I had no example to show them; I just kind of threw some string, a baby food jar full of nails, and some hammers on the grass and gave a quick speech about making a clock shape with the hammered nails-- the kids took easily to this project.  Even the youngest, age 5, made two of these!
The children didn't seem to need much direction at all.  Each came up with a creative way to wrap the string.  Some wrapped one color in a 'spider web' and then wrapped another color on top to form an initial letter.  Others made circular patterns.  Some made stars.

The finished projects are displayed in their bedrooms.

Wednesday, July 7, 2010

Red, White, and Blue Pretzel Rods

Keep celebrating the USA colors all summer long!  The theme at Camp Gramp this summer was "Stars and Stripes" so for a snack one day, the kids made these pretzel rods.  We melted a large bar of white chocolate in a double-broiler (a bowl of chocolate in a larger bowl of really hot water on the stove top). Then we dipped the pretzel rods into the chocolate, using a spoon to spread the chocolate evenly.  While the chocolate was still wet, we sprinkled red and blue sugar on the pretzels and rested them to cool on parchment paper.  I wrote names on the paper so that we'd know which was which when it came time to eat our snack.

Tuesday, July 6, 2010

Camp Gramp Key Chains

During the week of Camp Gramp, the kids do many crafts.  We try to make the crafts meaningful and useful, so we spend all year in search of the coolest things to make.  This key chain  (found on Ucreate) ranks right up there.  It is useful, and the process teaches the kids how to use a sewing machine. All that is required is a few straight lines of stitching, so the kids are exposed to using the machine without the frustration. (I can't be the only crafter who has to get the sewing machine manual out every time I start a new project!!)
The kids and I started the week with a field trip to JoAnn Fabrics (try taking seven kids into that store...see what happens) so the kids could pick out two long ribbons and one short ribbon.  The longer ribbons were mostly cut to order, so we got each cut to a quarter yard.  A quarter yard was more than enough for one key chain.  For the shorter ribbon that wraps around the key chain in the last step, I encouraged the kids to share spools of thin ribbon.  That required some artistic juggling, but we managed.

First step: sew together the two fat ribbons, using one line of stitching down each side.

Second step: insert the metal key chain (also found at JoAnn Fabrics, in the purse craft section) and sew the ends of the newly stitched fat ribbon together to form a loop that holds the metal key chain.

Third step:  pinch the loop of fat ribbon together, about a quarter-inch above the metal key chain.  Wrap the thin ribbon around this area and sew it securely with two straight stitches along the edges of the thin ribbon.  (This part was tricky for the youngest crafters--due to the thickness of the many ribbon layers-- so I had them depress the sewing pedal while I maneuvered the key chain through the machine.)

Each crafter now has a key chain made to order!

Monday, July 5, 2010

Camp Gramp Batik T-Shirts

Every summer I take all of my parents' grandkids to their house to spend the week for what we like to call Camp Gramp.  We swim, go on trips, watch movies, and do crafts.  The kids pitch in by doing a big chore each day to help their grandparents (weeding is a biggie) and by rotating daily chores such as setting the table, cleaning the bathroom sink area, and under-the-table crumb patrol.

We make t-shirts each year to wear on our day trips. In the past, we've done tie-dye and bleach pen designs. This year we made Batik Shirts. 
Making the shirts took about two days.  First, we drew designs on plain t-shirts with gel glue.  White glue tends to run too much for the look we wanted. We used white shirts, but any light color would work.  It is important to put a plastic grocery bag or other barrier inside the shirt so that the glue and paint do not go through to the other side of the shirt.

After letting the glue dry for a day, we painted over the design with watered-down acrylic paints.   To get light colors, add more water.  For darker colors, add more paint.

We let the painted shirts dry for a few hours.  Then we soaked them in warm water and gently rubbed off the glue.  Some of the paint does run out of the shirts at this point, but once they dried in the sun again, the painting was made permanent.  The area where the glue had been is now the color of the shirt (white, in our case).